skip to main | skip to sidebar

Pages

  • Home

Cups & Cakes

We're so full our tummies ache.
Showing posts with label HOMEMADE. Show all posts

My Favourite Mexican Treat!

1:56 PM | Publish by Canoodlin'

When I was growing up, almost every Sunday after church we'd go to the only decent Mexican restaurant around - Chi Chi's. Regrettably, it closed down when I was still very young, but I can still remember the decor, the song they'd sing on birthdays (Happy Birthday, OLE!!), and most importantly, the FOOD! It's hard to put into words just how much my entire family LOVES Mexican food and sometimes I think we should've called ahead to notify them we were on our way so they wouldn't run out of food.

I could write, in detail, about the fresh tortilla chips and the tastiest salsa (packed with my favourite Mexican herb: cilantro), the tacos, or the generous portions of rice and refried beans. My brothers, Yankee Noodle and Hot Dry Noodlin', may elaborate in subsequent posts about the all-u-can-eat Sunday lunch buffet...more specifically, the all-u-can-eat sopapillas, but I'm writing today to discuss my favourite Mexican dessert: deep fried ice cream! I've even been known to lick the bowl clean of the remains of this dessert - it's just SO GOOD!
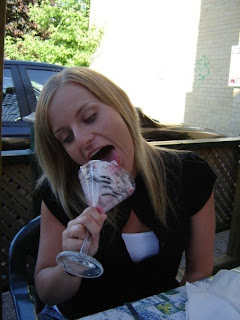
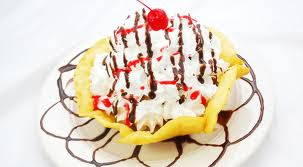
If you've never heard of (or tasted) Mexican deep fried ice cream: FOR SHAME!! It is a giant ball of vanilla ice cream that is coated (typically) with a combination of corn flakes, cinnamon, and sugar that is then deep fried to golden, crispy perfection! Once fried, it is either served in a bowl OR (even better) a cinnamon and sugar coated, fried tortilla bowl. It is then topped off with whipped cream, a cherry, and your favourite dessert topping: chocolate fudge, caramel, or strawberry sauce. The best part is cracking through that hot, corn flakey crust and seeing your spoon disappear into the cold, soft ice cream. It's sweet, soft, crunchy, warm, AND cold - all in one dessert.
I was at my cousin's place the other night and she told me she had made her own version of Mexican fried ice cream and I could have cried tears of sheer happiness. Her's weren't deep fried (for those of us trying to stay somewhat healthy) but they still tasted absolutely divine!! She coated the vanilla bean ice cream balls in a vanilla almond cereal (maybe Special K?) and topped them off with a cherry and beyond-generous helpings of chocolate fudge drizzle. Below is a before chocolate drizzle shot and an after chocolate drizzle shot.


Before
After
My cousin definitely out did herself - it was almost unimaginably delicious!!! I'm not entirely certain how to fully express my deepest gratitude to her for making this and bringing me back to some of my fondest childhood food memories...maybe I'll take her out for Mexican Fried Ice Cream sometime :)

Labels: DESSERTS, HOMEMADE, MEXICAN 1 comments

Chicken & Black Bean Stew: An Outlier

10:56 PM | Publish by Yankee Noodle

One of the first lessons I learned as a young eater was that, in general, healthy food and tasty food are opposites. Take a look at this scientific graph:
You may never have drawn a graph like this, but we all naturally understand this basic truth. There is an inverse relationship between health and taste. However, in rare cases, we encounter outliers (denoted by the "O" in the graph). These are healthy foods that taste great. They are very elusive indeed.

One such dish is Chicken & Black Bean Stew.


If my memory serves me right, I first tasted this meal almost a decade ago. Believe it or not, it was created by none other than yours truly. In the early days of our marriage, it wasn't yet established who had the talent to cook. I found this recipe in a cookbook and the picture looked mighty appealing, so I attempted it. There are nearly 20 ingredients. As a novice, I took the easy way out and used garlic powder and onion powder instead of chopping garlic and onions, but for the most part I followed the remainder of the recipe. For several years this dish was my masterpiece. I made it with pride every few months. One time I even put it in bread bowls.

And then it happened... one time I overcooked it and it was painfully dry. I wasn't too worried. There's a fine line between perfecting this dish and ruining it, because it's best when the chicken is a little burnt or singed. But the next time I overcooked it again. The third time was even more tragic: I destroyed Mrs. Noodle's wok. A recurring problem for me back when I was still allowed in the kitchen was that I got distracted by a baseball game, a conversation, or random thoughts. This time the distraction lasted a little too long and the burnt food stuck to the wok, causing irreparable damage. I'm not sure, but it might have been that very day that I was banned from the kitchen.


These days, Mrs. Noodle prepares the dish, only she does it well. She chops the garlic with gusto, she chops the onions with vigor... she includes not only the red peppers and green chilies but also yellow peppers to make it even more beautiful. But the wonder of this dish remains: it tastes incredible while being leaving the eater completely guiltless. Want a second helping? No problem. Third helping? Absolutely. Chicken, black beans, corn, carrots, tomatoes, onions, bell peppers, green chilies, onions, spices, lemon juice, lime juice... all of it healthy, and yet it combines to create a hearty, tangy work of art for the eyes and stomach.

CHICKEN & BLACK BEAN STEW
YANKEE NOODLE RATING: 10.44 out of 10 mmmm's (as prepared by his wife; 8.3 out of 10 mmmm's when prepared by himself)

Labels: GOOD AND HEALTHY, HOMEMADE, NOT ALLOWED IN THE KITCHEN 0 comments

Cake Pop-o-Rama!

9:40 PM | Publish by Canoodlin'

Last week, a friend of mine was so kind as to bring me a treat to work. I let the excitement build as she pulled it from her purse and was delightfully surprised when a Starbuck's bag appeared! I can't help it...I love Starbuck's products...what with all their buttery, sugary goodness...
Out came the cutest confectionary creation I had ever laid eyes on: a cake pop! What is a cake pop, you ask? Well, instead of candy on a stick, it's a ball of CAKE on a stick that is covered in chocolate and decorated. I was so lucky as to have been brought a chocolate raspberry cake pop that tasted absolutely and sinfully scrumptious. It's the perfect idea, really. I love dessert but find I spend way too much time enjoying the main course that it leaves hardly any room for sweets afterward (not that that stops me from having dessert still, mind you). A couple of bites and sadly...it's all over...but on the bright side, it's just enough to satisfy!


I couldn't stop thinking about that cake pop, so the next day I thought I'd pay it forward and bring one to another friend of mine (and also one for me). She loved it as much as I knew she would and I left thinking, "I could MAKE these MYSELF!!" I checked out a few how-to videos on youtube and was excited to learn how simple they (appeared to) look to make. With Valentine's Day around the corner, it would make a perfect theme. And so began the quest of the cake pops.

Together with my new cake-pop-obsessed friend, we set out to buy the necessary supplies: cake mix, icing, sprinkles, melting chocolate, and sticks. While perusing through the store, we stumbled upon an ENTIRE cake pop making section complete with scoops and fancy stands, but for nearly $10, we concluded that we could conjure up our own stands. In hindsight, we now fully understand the value of the pre-purchased cake pop stand (you'll see why).

Step #1: Bake a cake! We did cupcakes so they would cool faster.


Step #2: Allow cake to cool. The waiting was TORTUROUS!


Step #3: Crumble cake into tiny morsels.

Step #4: Mix cake crumbles with about 1/2 can of icing...until it becomes gooey and malleable.


Step #5: Form cake balls with hands (try not to eat it...I know...it's hard).

Step #6: Set cake balls in fridge for about 10 minutes.

Step #7: Melt some chocolate in the microwave, dip about an inch of a stick in the chocolate, and place the stick into the cake ball. The chocolate helps to adhere the stick to the cake ball.


Step #8: Again, place the cake pops in the fridge to set. My suggestion is to refrigerate these longer than you think necessary so they don't fall off the sticks (personal, tragic experience).


Step #9: Melt more chocolate...enough to coat all of your cake pops. My suggestion is to melt the chocolate in stages to avoid hardening of the chocolate. We tried a double boiler but our attempts to temper chocolate failed...quite miserably. I would melt enough chocolate to coat about 3-4 cake pops at a time.

Step#10: Dunk the cake pop into the chocolate and spin it until there are no drips (this is the time consuming part).

Step #11: Place the cake pop into the stand. Oh wait...we didn't buy the stand...so we put ours in drinking glasses. Bad idea. If you are going to make these, either cough up the $10 or find a piece of styrofoam to stick them into.


Step #12: Decorate as desired!


Our unfortunate...and ultimately hilarious mishaps were only amplified by the fact that it was nearing midnight and we all needed sleep. We ended up ditching the poorly melted chocolate and covering some just in icing instead. My words of wisdom are:
Add enough icing so the dough is quite sticky (or else they fall apart).
Don't make them too big (or else they fall off).
Don't melt an entire vat of chocolate at once (or else it will harden).
Don't do this when you are sleep deprived (or else your cake pops will turn out like ours...).


Exhibit A (below) shows a true travesty of cake pops gone wrong:

All in all, it was an extremely fun experience and the cake pops tasted INCREDIBLY yummy. So chocolatey...so gooey. I will attempt this, yet again, now that I have learned some valuable lessons, and master this cake pop until it is perfected.

Labels: DESSERTS, HOMEMADE 2 comments

Mom's Taco Salad - A Cherished Family Heirloom

9:47 PM | Publish by Yankee Noodle

If my memory serves me right, this dish has now been savored in various forms in our family for two decades. When Mama Noodle unveiled this classic on New Year's Day of 1990 or 1991, we had never seen its equal. No one quite knew what to do. Many years later, when I was living 2,000 miles from Mama Noodle, my wife Yankee Noodle Candy was sweet enough to prepare me a taste of home. Her first couple attempts were abject failures for various reasons (make sure you rinse the beans!). But in October of 2006, she aced it, and since then life in our dining room has never quite been the same. I'm told that Hot Dry Noodlin' and Canoodlin' also create variants of this dish. It's quite possible that this is my all time favorite.


The recipe will not be unveiled. As I said, it's a cherished family heirloom. But this blog is about eating, and there's plenty to write about the process.

These days, the first step for me is to hold my head over the pot of chili and just sniff it.


The first step in preparation is to grab some iceberg lettuce and scatter it around the plate. Be careful! If someone (perhaps a wife or a mother) is in charge of how much you eat, you don't want to stack the lettuce too high, because the finished product will appear unreasonably monstrous and you'll be blamed for taking too much food, even though you didn't really take all that much. The reason? The lettuce pile artificially inflated the perceived amount of food you're about to eat.


The next step is to lay out the tortilla chips, although some prefer to do this before the lettuce step. We prefer a brand called Santitas that we discovered out West (although it's now available in the Midwest!), an affordable and adequately salty brand that's slow to sog. Again, don't take too many curly chips or you'll get in trouble for taking "too much food" even though it's just empty pockets of air caused by abnormally shaped chips.


Now it gets serious. The chili - the ground beef, the beans, the bell peppers, onions, tomatoes, spices, etc - is truly a work of art. Hopefully you have an inconspicuously flat bed of lettuce and chips so that you can take as much as possible without making a mess or looking like a hog.


The final step is to bury the chili in shredded cheddar cheese. Watching it melt is an event in itself. A common mistake made by the novice eater at this point is to add sour cream. This must be avoided. You don't want to taint a masterpiece.


It's usually at this point that I set my plate down and hope that the height of the glorious food goes unnoticed. I did pretty well tonight. The pile wasn't large enough to create suspicion.


This meal moves in stages. First, you grab any visible chip and gently lift it (together with any food that rests upon it) toward and into your mouth. When the chips have disappeared or only soggy ones remain, it's time to pick up your fork.


Finally we arrive at "The Last Bite." Remember how important it is to nail this!


Upon finishing, the eater is left traumatized that the meal is over.


But wait! Don't forget that this meal is actually even better on the second day!

MAMA NOODLE'S TACO SALAD (YANKEE NOODLE CANDY VARIANT)
YANKEE NOODLE RATING: 44 out of 10 mmmm's.

Labels: HOMEMADE, MEXICAN, PHILOSOPHY OF EATING, TACO SALAD, THE LAST BITE 1 comments

Lasagna Rolls & "The Last Bite"

9:21 PM | Publish by Yankee Noodle

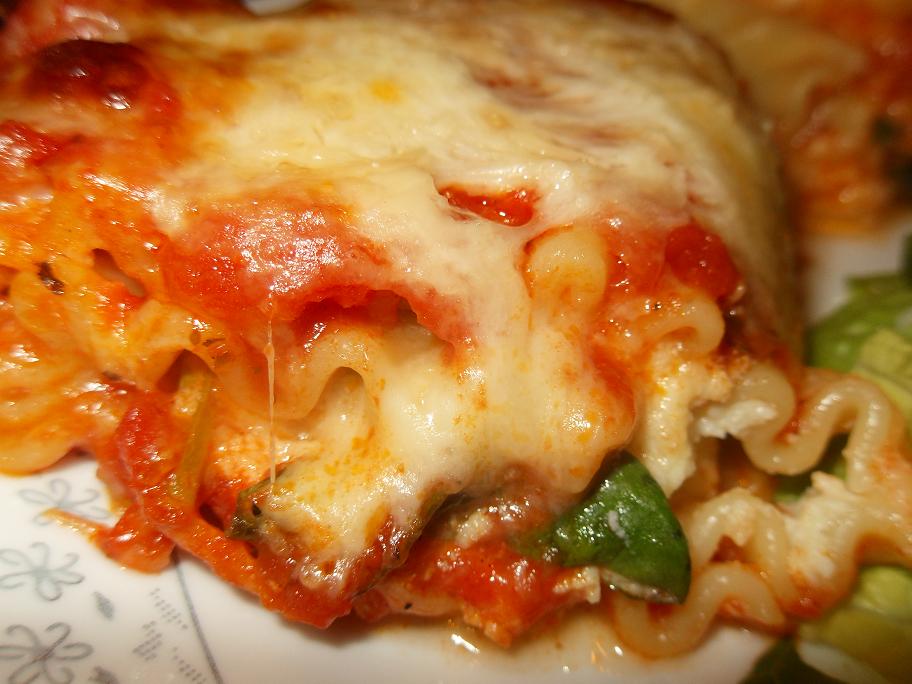
If my memory serves me right, my amazing wife first created her inimitable Lasagna Rolls on a hot, humid day in the summer of 2006. Since then, she has come up with many variations, but this remains my favorite.


Lasagna is one of those foods that I did not like as a young eater but came to love as my palate aged. The question is: was it a change in the composition of my impeccable tastebuds, or did I simply open myself up to the possibility of new forms of lasagna? It's quite possible that the lasagnas I consumed in the past were too heavy on the ricotta, too light on the mozzarella and spinach, or perhaps - most devastatingly - tainted with mushrooms.


In any case, this particular version of lasagna is a winner, as you can plainly see. We like to enjoy it with a salad of iceberg lettuce, croutons, parmesan crisps, and various herbs and spices.


I alluded in my introductory post to "The Last Bite," and this concept deserves further discussion. Too often people eat their food without enough thought. They see the food and eat it. Sadly, this deprives the eater of the suspense and ultimate fulfillment that come with preserving "the last bite." Who wants to end their meal with a random crumb or a taste of decent but mediocre bread when it could have ended with the best possible piece of the best food available? Well, no one does... but too many settle for this anyway. We need to pursue "The Last Bite." Let me show you how it's done.

In this dish, we have lasagna and we have salad. While the salad is good, the lasagna is better, so we should start with the salad, but that's the patented ordering system that I'll address in another post. The key is to eat the best-looking piece of each food group last. Take a look at this piece of salad:


The lettuce looks crispy and juicy, and it's adorned with beautiful herbs and spices and a smattering of parmesan. It will obviously taste great. This should be the last bite of salad.

Now let's take a look at the lasagna. Every bite is blissful, but see how this piece combines all the best aspects of the lasagna rolls? It's a perfect mixture of crispy and toasty on one side and excessively cheesy on the other side. It's also a very large bite, which means the eater (me) will be able to savor it for quite some time. This is an excellent choice for "The Last Bite" of the meal.


Now let's talk about technique. When partaking of the last bite, you need to make sure you'll be able to enjoy it in peace. If you've been engaged in conversation, wait for a natural break so that you won't feel compelled to answer any time soon. You don't want to be interrupted in the middle of your last bite. Since I usually wear glasses, I take them off at this point (if I haven't already) so that I can really get a good look at the food as it approaches. Ensure you're in a comfortable position.

Place the last bite in your mouth and SAVOR. Take your time. No one should be judging you, and they should be respectful of this moment. Yes, you'll look like an idiot, but don't let people's perceptions of you get in the way of your enjoyment of your food. Chew slowly. Swirl it around. Enjoy it.


Next time you're enjoying a great meal and you aren't in the company of people who have any impact on your employment situation, go ahead and practice "The Last Bite."

YANKEE NOODLE CANDY'S LASAGNA ROLLS
YANKEE NOODLE RATING: 9.93 out of 10 mmmm's.

Labels: HOMEMADE, LASAGNA, PHILOSOPHY OF EATING, THE LAST BITE 0 comments

Butter Chicken: A Review

5:30 PM | Publish by Canoodlin'


Growing up, we were a fairly traditional "meat-and-potatoes" kind of family. Mom had us three children to take care of and our Dad selflessly worked shift work...I'm sure that didn't leave much time to be thinking of extravagant meals. As I've grown older, I've unleashed my palette to the wonders of Asian and Indian cuisine and I must say...it's been an unforgettable journey!!

When my friend said she was coming over and making me butter chicken I could hardly wait! Here's what I knew about butter chicken: it was an Indian dish, it had chicken, and it had butter. I hung my head in shame as I admitted to my friend that I had never eaten it before. For SHAME, I thought! I've had beef vindaloo and countless amounts of curries before, but never this dish - the most popular East Indian dish in the world! I felt humbled and honoured to be a part of the cooking process but most of all grateful that I would be a part of the eating process too.

Something interesting I learned about butter chicken is that it is a tomato-based recipe! I never knew that! We sauteed onions and garlic (really...is there any better smell??) and added cubed chicken thighs (they stay juicier). Then we added tomato sauce, butter, cream, milk, garam masala, cayenne, paprika and salt and stirred until it thickened.

As the butter chicken was simmering, my friend prepared basmati rice, roasted carrots, and wilted spinach. The carrots were coated with a bit of olive oil, salt, and pepper and put in the oven. We didn't notice that the oven temperature was too high so the carrots came out looking like sweet potato fries! I thought it was a wonderful accident - they tasted delicious! The spinach was wilted simply in a frying pan with a bit of salt, pepper, and lemon juice.
What is the key to any Indian dish though?? Baked NAAN BREAD: a vehicle with which to sop up and soak up sauce.

Eating this butter chicken was pure delight! The garam masala added pungency without the intense spice of a curry dish and the tomato sauce, butter, cream, and milk combined in a heavenly, creamy sauce that was absorbed beautifully by the naan bread. I found the best way to eat this was to have a mouthful of the butter chicken with rice followed by a crunchy, roasted carrot and finished with a bite of zesty spinach to clean my palette. The key was repeating this process about 30 times until I was left with a plate full of left over sauce to be cleaned up by my last bite of naan.

What a gorgeous first experience with this dish. I can never fully repay my friend for introducing it to me and I will be forever in her debt.


Labels: ETHNIC, HOMEMADE 0 comments

Quinoa & Chickpea Salad: A Recipe

4:56 PM | Publish by Canoodlin'


It's only been in the last year or so that I have tried my hand at quinoa and it turns out...it's delicious in almost anything! With so much versatility and so many health benefits it really is a power food! I've tried it in a stuffed pepper recipe, I've tried it as a warm cereal with milk and cinnamon, I've tried it as an alternative to rice and pasta, and I've tried it in chili. My most recent achievement, however, is a quinoa and chickpea salad. I lifted flavours from the Southwest and combined it with a bit of Greek inspiration and VOILA...I ended up with a super fresh, SUPER healthy salad.

With a recipe like this, I tend to not use measurements because I do it to taste. You could alter these ingredients to your liking but the most important part is to have fun with it! You might even come up with a completely different take on my recipe and if you do, please share it! The quantities I've given are approximated...

Ingredients:
Quinoa (I used 1 cup uncooked - once cooked I added about 2/3 of the pot)
Chickpeas (I used 1 whole can, rinsed)
Cherry Tomatoes (quartered or halved depending on the size)
Cucumbers (diced)
Pickled Jalapenos (I use a lot because I love spice, diced)
Juice from the jar of jalapenos (about 1 tablespoon)
Garlic (about 3 cloves, finely chopped)
Lime Juice (about 3 tablespoons)
Cilantro (I buy mine in a paste form, which sounds weird, but I never use enough fresh cilantro to warrant purchasing an entire bunch. You could definitely use fresh cilantro though)
Cumin (1/2-1 teaspoon)
Chili Powder (1 teaspoon)
Garlic Powder (1/2 teaspoon)
Paprika (1/2 teaspoon)
Extra Virgin Olive Oil (about 2 tablespoons)

Once the quinoa is cooked, it's virtually the easiest dish to put together. Here are the detailed instructions about how to prepare it. Ready? Throw all of the ingredients in a bowl and toss together.

You can eat this just as a light lunch or a side dish at dinner. When I made this, we served it with pork souvlaki but you could just as easily serve it with a chicken breast or shrimp skewers!

Please enjoy!

Labels: HOMEMADE, RECIPE 1 comments

Holiday Desserts of Wonder

5:17 PM | Publish by Canoodlin'

If my memory serves correct, it was back in the Christmas of 2010...the presents patiently awaited us under the beautifully lit tree, the fire was on, and the snow was piled high outside. We had just finished our Christmas dinner at home with our parents and were basking in the gluttony of the season when out of the corner of my eye, I saw Mom pull something out of the freezer. Immediately my mind began to race...wondering what could possibly be coming next. It was, in fact, time for dessert; however, it never usually came out of the freezer (unless of course it was our Mom's birthday special: oreo and vanilla ice cream cake with chocolate fudge topping...but that's a whole other post).

Being as obsessed with food as we are, we did the buttons back up on our pants and approached the kitchen counter. The anticipation was almost unbearable! Mom said, "now this is just something new I tried...I don't really know if it will be good," which is always how she introduces something delicious...so humbly. As she unveiled the masterpiece, we all, in unison, "ooooooh'd" and "awwwww'd" at how stunning it was! It was a cranberry/pistachio/oreo ice cream cake. When you think of a dessert that could in itself BE Christmas, this was it! A dark, crumbly oreo crust, topped with a layer of whipped, vanilla ice cream then a layer of stewed, semi-sweet cranberries, and then ANOTHER layer of ice cream with whimsical swirls of cranberry sauce on top and crushed pistachio pieces sprinkled along the edges. I almost wanted to cry it was so beautiful! The bright, contrasting, Christmas colours were one thing, but the perfectly aligned layers were enough to make the judges on Masterchef give a standing ovation. Mom served us a generous piece and we gathered around the table once more, unbuttoned our pants, and took off on an adventure of flavour.

This dessert had almost every flavour profile. The sweetness of the ice cream and oreo crust were perfectly balanced with the tartness of the cranberries and then you were hit with a hint of saltiness from the pistachios. My taste buds were exploding! The variety of textures only added to the pure joy as you went from soft to chewy to crunchy. I had never had a dessert like this in my LIFE! We're a chocolate-loving family and typically the desserts we have at family dinners are sweet and decadent (not that I mind that...because I don't), but it was a new and incredible experience around the table that night.

BEHOLD! The cranberry/pistachio/oreo ice cream cake!


It's hard to believe your eyes, isn't it? I know. I was there. This dessert goes down as one of THEE most memorable desserts of my life.

Now, onto something completely different...kind of. This next dessert is in a different category of desserts. There is a "Toblerone Cheesecake" category, right? No? Oh...well I'm going to make it a category so this dessert can stand alone as it so deserves. We all know cheesecake is delectable and that Toblerone is the best chocolate bar on earth so naturally, they combine to make the most decadent dessert! My boyfriend's Dad is a professionally trained chef (how SWEET it is!) and made Toblerone Cheesecake this Christmas. Heaven's be praised!

A crumbly, buttery crust...a rich, creamy cheesecake filling...a light dusting of Toblerone shavings on top. Wait, no...CHUNKS UPON CHUNKS of Toblerone pieces! Enough of them to make you wonder how the cheesecake didn't cave in! It was one of those desserts you'd see on display in a bakery and think it was a fake display...only it wasn't fake! It was REAL and I could eat it.

When is next Christmas? Tomorrow?


Labels: DESSERTS, HOMEMADE 0 comments

Fruit Fiesta!

12:25 AM | Publish by Yankee Noodle

In the aftermath of my pizza fiasco, Yankee Noodle Candy was kind enough to make me a favorite dessert...

Fruit Fiesta is always an eye-popping array of color. The beautiful green and red fruits with their juices surrounded by the cinnamon sugar tortilla chips reminds one of a desert cactus flower in April. This dish was discovered a few years back and is a rare treat in the Yankee Noodle household.

This dish begs the question: at what point does food become art? Is there a point at which the value of a dish is greater as something to behold with the eyes - something we preserve for future generations to gawk at and discuss - than as something we slowly and lovingly consume and eventually use as energy for our bodies?

VERY DETAILED DIRECTIONS: Chop up a kiwi, an apple, and some strawberries. Add sugar and strawberry jam. Put it in the fridge for a while. Allow the sugar to draw out the natural sugar from the fruit and accumulate at the bottom of the bowl as the most luscious juice imaginable. Stir. Cut up and bake some tortillas and add cinnamon and sugar. Eat this like chips and salsa. Enjoy it. ENJOY IT.


I know what you're thinking: how could anyone eat something so picturesque?


That's why we have cameras. To preserve the beauty. Oh, the beauty!


YANKEE NOODLE CANDY'S FRUIT FIESTA
YANKEE NOODLE RATING: 11.44 out or 10 mmmm's.

Labels: DESSERTS, HOMEMADE 0 comments

At least my name isn't Papa John Schnatter

12:10 AM | Publish by Yankee Noodle

My wife, Yankee Noodle Candy, and I will go down as one of the great couples in kitchen history, although I do nothing but eat. However, there have been several occasions (diminishing in number each year) for which I've been allowed into the kitchen to do something other than "test" the food and burn the toast.

To celebrate the launch of CUPS & CAKES, she was kind enough to reluctantly let me help make pizza tonight. She quite foolishly figured it would do no harm to let me chop some bell peppers and add the ingredients to my half (60%? ... ok, 70%) of the pizza. No one got hurt.

Homemade pizza is always an excellent choice, even for rank amateurs such as myself. Not everyone has the time or talent to create a masterpiece, but I'm told it isn't difficult to make a quality pizza, and for much less money than it costs to purchase one. Besides, for every Carfagna's, Donato's, Burgh's, or The Pie that leaves you in ecstasy, there is a Papa John's that will leave you wanting to hurl. And then there are hundreds of those overhyped but mediocre places in between.

Under close supervision, I chopped the green and red bell peppers. Sharp knives are cool.


It was all downhill from there though. After admiring my work I began to place the ingredients onto the dough and sauce. My wife said something about ingredients. I added the fresh mozzarella. I added the cheddar. I proudly added the pretty green and red bell peppers. I added the pepperoni (turkey - as you can see we're clearly concerned about calories here). I added more cheese. I added the oregano. I added more cheese on top of each slice of pepperoni, and then some more cheese.


Looks good, but, in retrospect, a bit cluttered. Can't see much dough or sauce.

The pizza was delicious, as always. The only problem is that the dough was a little quite soggy, especially near the edges. Homemade pizza had always been better than this in the past, leaving me perplexed. I knew it was my fault, but I didn't know why.


If you're like me and you're a perpetual failure in the kitchen (besides "testing" the food) I can't emphasize enough that it's important to listen closely to the expert. In my haste to pile on as much delicious food as possible, I paid little attention to the "something" my wife was talking about a few paragraphs up, which was that adding too many ingredients will cause excessive moisture as the juices cook out of the vegetables and cheese. That's today's lesson for neophytes, and one that I won't soon forget.

Despite the moisture, the toppings were still delicious. Wetter ingredients, wetter pizza, still better than Papa John's. And again, no one got hurt.


YANKEE NOODLE CANDY'S HOMEMADE PIZZA
YANKEE NOODLE RATING: 9 out of 10 mmmm's.
YANKEE NOODLE RATING UNDER ORDINARY CIRCUMSTANCES (WHEN HE DOESN'T HELP): 10 out of 10 mmmm's.

Labels: HOMEMADE, NOT ALLOWED IN THE KITCHEN, PIZZA 0 comments
Older Posts »
Subscribe to: Posts (Atom)

START HERE - ABOUT US

  • YANKEE NOODLE
  • HOT DRY NOODLIN'
  • CANOODLIN'

WELCOME TO CUPS & CAKES...

... a sentimental journey in which three siblings living in three different countries discuss food they've eaten.

SHAMELESS ANNOUNCEMENT: WE WOULD GLADLY EAT YOUR FOOD!

If you're in the United States or Canada and you represent a restaurant, a bakery, a distributor of food found in grocery stores, etc, we would be more than happy to eat and review your food. Please write yankeedoodledandy @ gmail for details.

Contributors

  • Canoodlin'
  • Shane
  • Yankee Noodle

Followers

Powered by Blogger.

Blog Archive

  • ▼  2012 (16)
    • ▼  April (1)
      • My Favourite Mexican Treat!
    • ►  February (4)
    • ►  January (11)

Labels

  • CHICK-FIL-A (1)
  • CHICKEN TORTILLA SOUP (1)
  • CHOCOLATE (2)
  • COKE (1)
  • DESSERTS (4)
  • ETHNIC (1)
  • FAST FOOD (1)
  • GOOD AND HEALTHY (1)
  • HERSHEY (1)
  • HOMEMADE (10)
  • LASAGNA (1)
  • MEXICAN (2)
  • NOT ALLOWED IN THE KITCHEN (2)
  • PHILOSOPHY OF EATING (2)
  • PIZZA (1)
  • RECIPE (1)
  • TACO SALAD (1)
  • TEDDY GRAHAMS (1)
  • THE LAST BITE (2)
Copyright (c) 2010 Cups & Cakes. Design by Template Lite
Download Blogger Templates And Directory Submission.